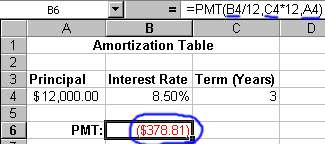
Figure 1. Using the =PMT() function
This lesson guides you through the process of creating an amortization table with Microsoft Excel. It's a useful example because an amortization table can help you make wise decisions about borrowing money or repaying loans. An amortization table shows for each payment of a loan how much of the payment is going toward the interest on the unpaid balance and how much is going toward the principal.
This lesson explains how to create an amortization table. Before continuing you should read the related concept which explains what an amortization table is.
Creating an amortization table is a 3 step process:
Step 1
The key to creating an amortization table is the PMT function. The PMT
function is a built-in function that computes the periodic payment given the principal,
rate, and term. Here is the syntax:
=PMT(rate, term, principal)
For example, if you borrow $12,000 at 8.5% for 3 years, your monthly payment would be:
=PMT(.085/12,3*12,12000) = $-378.81
Notes:
Using the PMT function and a few simple formulas, you can generate an amortization table.
The first step is to specify the terms of the loan and use the PMT function to calculate the monthly payment.

Figure 1. Using the =PMT() function
Notice that in the above example the parameters to the PMT function are cell references. This allows you to change a value in row 4 and quickly see how your change effects the monthly payment--especially handy when you are doing what-if analysis. Also notice that the value in B6 is displayed in red and in parenthesis. This is the default format for displaying negative numbers.
Step 2
In this step you add the first two lines of the table. Using the View Formulas
feature of Excel, the following figure shows the formulas in the first two lines of our
amortization table:

Figure 2. First two lines of an amortization table with formulas showing
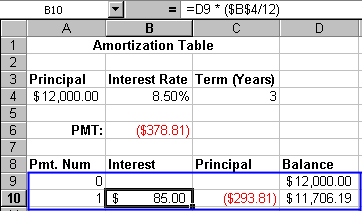
Figure 3 below shows the values you would see given the above formulas.

Figure 3. First two lines with values showing
Step 3
The relative references in row 10 refer
to other terms in the amortization table so we can use the Fill Down command to fill out the
other rows in the table. The avi movie below demonstrates how to use the Fill Down
command. In short,
If you would like a copy of the spreadsheet developed here it is available for download from this page. Both the Microsoft Excel and Microsoft Works versions are available.
Copyright 1999 by the Curators of the University of Missouri |