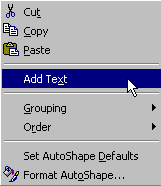
To insert text inside an AutoShape, right-click on the shape, and you get the following shortcut menu:

Choose Add Text, and a text box whose shape is relative to the AutoShape is created on top of the shape. Alternatively, use the Text Box feature.
Click on the Text Box icon ![]() on the Draw toolbar. Then click in the desired area, or
click and drag to size the box. The text you type can be formatted in any font, size, or
color. Make sure the box is big enough to hold the text. If not, you can always resize the
box. Resizing the box will only make the box bigger/smaller. It will not affect the size
of the font.
on the Draw toolbar. Then click in the desired area, or
click and drag to size the box. The text you type can be formatted in any font, size, or
color. Make sure the box is big enough to hold the text. If not, you can always resize the
box. Resizing the box will only make the box bigger/smaller. It will not affect the size
of the font.
You can change the direction of the text in the text box. When a text box is selected, a Text Box toolbar appears.
![]()
By clicking on the Change Text Direction icon ![]() you can change
the orientation of the text.
you can change
the orientation of the text.
You can choose to add borders to the text box or to color it.
![]()
You can use the part of the Draw toolbar shown above to choose colors, lines, shadowing, etc.
If you insert text by choosing the seperate text box object, it will not move and resize along with the AutoShape. In order for the text box and AutoShape to be one object, you will have to group them together.