Often, you will want to represent information in the form of a table. Creating one is simple.
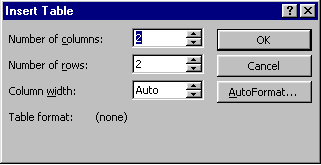
With the insertion point placed where you want to insert the table, choose Insert Table... from the Table menu. You will get the Insert Table dialog box:

Choose the number of rows and columns you want. You can specify the column width at this point or later. The row height is the height of a line. You can also specify the format by clicking the AutoFormat button now or later.
Word will place the table on your document. If column width was auto, the table will be spread out along the width of the document, and the columns will be evenly spaced. By default, the table has borders and lines.
The cursor will be placed on the first cell (first row and first column). Pressing the right arrow key or the Tab key will move the cursor to the next cell (i.e., same row, next column or next row first column if the cursor is to the right of the last column). You can also use the up, down, and left arrows. Alternatively, you can click with the mouse pointer on any cell you want to enter data in.
With the cursor in the desired cell, type the data in. If the data is longer than the column width, the row height will be increased, and the text wrap down to the next line. (So the entire row, not just this cell, will increase in height) Use the Tab or arrow keys to move between cells.
Copyright 1997 by the Curators of the University of Missouri