Moving
You will probably want to move a graphic image around on the page. As you move the
pointer over the image, it will change to the move pointer: ![]() . Click on the image and drag to the desired
location.
. Click on the image and drag to the desired
location.
When you move or resize objects, keep in mind the invisible grid.
You can also change the coordinates of the image. With the image selected, choose Picture...
under the Format menu, or click on the icon ![]() . You will get a Format/Picture
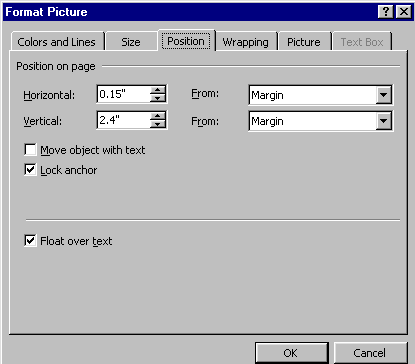
dialog box. Click on the Position tab. You will get the following box:
. You will get a Format/Picture
dialog box. Click on the Position tab. You will get the following box:

You can position the image relative to the edge of the page, the margins, or the column/paragraph. Just enter the distances in the Horizontal and Vertical boxes, and click on the arrow in the From box to see a listing of Page, Margins, and Column/Paragraph. For example, you can enter Horizontal: 1.4" From Margin and Vertical: 2.4" From Margin; the left side of the image will then be positioned 1.4" from the left margin, and the top side of the image will be positioned 2.4" from the top margin.
Move object with text: When this is selected, the image will be the set distance (you set this as above) away from the paragraph no matter where the paragraph is moved to.
Lock anchor: When this is selected, the image will always be on the same page as the paragraph.
Float over text: When this box is checked, the image will not be inline with the text in the paragraph. It can set as background or foreground.
With text: To specify alignment of an image with text, choose Picture...
under the Format menu (or click on the icon ![]() ). In the Format/Picture
dialog box, choose the Wrapping tab. You can choose any wrapping style and wrap
edge. Each style is pictured, so you can see what the style looks like. For a shortcut to
choose the wrapping style only, click on the Text Wrap icon
). In the Format/Picture
dialog box, choose the Wrapping tab. You can choose any wrapping style and wrap
edge. Each style is pictured, so you can see what the style looks like. For a shortcut to
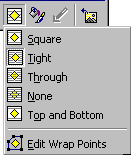
choose the wrapping style only, click on the Text Wrap icon ![]() on the Picture
toolbar. You will get a list like:
on the Picture
toolbar. You will get a list like:
 Choose the desired
style. Word97 wraps text around the image through the use of certain wrap points along the
edge of the image. You can edit these points, to make text wrap even more specific. Choose
Edit Wrap Points Choose the desired
style. Word97 wraps text around the image through the use of certain wrap points along the
edge of the image. You can edit these points, to make text wrap even more specific. Choose
Edit Wrap Points |
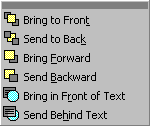
With other pictures: To specify the position of an image relative to another, choose Order under the Draw menu from the Draw toolbar. You will get a list such as:

Choosing Bring to Front or Send to Back puts the image in the foreground or background, respectively. Bring Forward/Send Backward: If there is a stack of objects overlapping, choosing this option will bring the image one step closer to the front (or send to back). You can also bring in front/send behind text.
Copyright 1997 by the Curators of the University of Missouri